

Fast Image Resizing with AWS Lambda

Recently I worked on a project that required fast image resizing. The result - resizing 1000 images (around 1.2 GB) to 2 thumbnail sizes in 3s. When I say resizing, I actually mean getting all those images from S3, doing the resizing, and storing them back to S3.
Want to become a JavaScript Warrior?

The Use Case
A lot of hi-res images would be uploaded with the Order (1000 or more), and as soon as they all got uploaded, the Admin would see the new Order and should be able to browse through the images - two sizes of thumbs alongside the original image. So the images needed to be available (nearly) as soon as the new Order came in, in different sizes. But we also had to wait for all the images to upload before starting to resize them - there were business rules preventing us from resizing images as they come.
We wanted this processing to be scalable, and to allow it to run in parallel without much programming overhead. AWS Lambda was a perfect match for those requirements.
AWS Lambda is Amazon’s compute service. You write code for your Lambda function, in Java, NodeJS or Python, and you upload it to AWS Console. Your Lambda function can do anything, and in our case it was resizing images. You only write the code, and AWS takes care of starting instances of your Lambda function, scaling it up or down and balancing hardware requirements. How do you run a Lambda function? There are several ways of invoking it - via an HTTPS request to a specific url or your Lambda (Amazon API Gateway), or when an specific event happens on one of the AWS services like SNS or S3. Here is the list of all available event sources for Lambda. http://docs.aws.amazon.com/lambda/latest/dg/eventsources.html
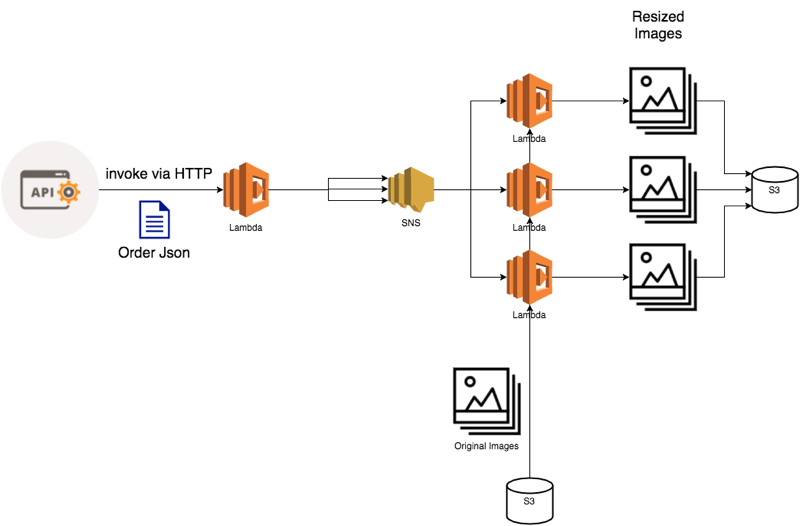 Two Tier Lambda Architecture
The Resizing
Sharp is a NodeJS image transformation library that way exceeds other libraries like ImageMagic in terms of speed. Sharp is 5x faster than ImageMagic. It uses VIPS, that only holds a part of the image in memory at one time, so it’s very fast and efficient.
But an issue with using Sharp in AWS Lambda environment is exactly the VIPS library. Since it uses native APIs [ check this ], it needs to be compiled on the same architecture that the Lambda runs on. You can’t just npm install sharp locally, zip it with code and upload to Lambda (as you normally would do with other packages). It won’t work, it will throw an “Invalid ELF Header” error.
Your two options are:
- Do the compiling on the same architecture that the Lambda runs on - which you do by spinning up an AWS micro instance and doing the compiling there, and then you download the result and copy it to your node_modules.
- Or download the sharp lib precompiled on the right architecture - download it here. Then you just bundle it in your node_modules and upload it with the code. Downside is that you can’t share your code with colleagues as easily. You may even want to check in your node_modules into git.
There is actually another option, that I only found after finishing this project. There is a node library - thaumaturgy that spins up a Lambda function to do the building of those special node packages, stores them to S3 and downloads them to your computer. Sounds great, but I haven’t had a chance to try it yet.
Pricing
AWS Lambda pricing is pretty affordable. First 1M requests per month are free. That’s a lot of computing time. [ reference details & check facts ] You are charged for every 100ms of execution time.
The price per 100 ms of compute time also depends on the hardware you choose to have your function executed on. But what that means is pretty interesting: if you choose the lowest spec hardware (128mb RAM, and CPU, Network and Disk scaled proportionally), you have a low price, but your code is executed quite slowly. If you choose the best hardware spec (1532mb RAM, and CPU, Network and Disk scaled proportionally), you are charged 5x more, but your script also executes 5x faster! So you actually pay the same amount in both cases, just in the second case you get a huge speed improvement! What’s the catch? Well, this works great for CPU intensive tasks like image processing. Faster CPU == less execution time. Or, if you do a lot of network related things, like getting a lot of images from S3 and storing them back, you similarly benefit from the proportionally faster network. But depending on what your use case is, you may not benefit as much in terms of execution speed from a better CPU or greater Network bandwidth. This includes tasks that are not CPU or Network intensive, for example our use case for this was a Lambda that calculates some offsets and publishes the messages to SNS to invoke other Lambdas. Since the task is not CPU intensive in any way, we don’t get any benefits from running this script on a faster CPU, and depending on configuration of the script, there are from 10 to 100 SNS calls, which is not a lot. And so, we stick with a much lower configuration, to make the costs even lower. We decided which hardware configuration was best for this kind of task by running tests on different configurations and comparing the results, to get the best balance between speed and cost.
The conclusion is this: - Always choose the best hardware, unless you have a specific problem that you’re solving that cannot be made faster by faster hardware. - Always conduct tests to confirm the above point and arrive at the best balanced configuration for your use case.
After analysing data we got from running the lambda on different hardware and with different numbers of photos, we found that in our use case the image resizing scales exponentially. At first, you get a great gain in performance by adding stronger hardware, but at one point, the performance increase starts to slow down. So there isn’t that much difference if you use say 1280 MB RAM setting or 1536 MB setting. There is however significant difference in 768MB versus the 1280 MB.
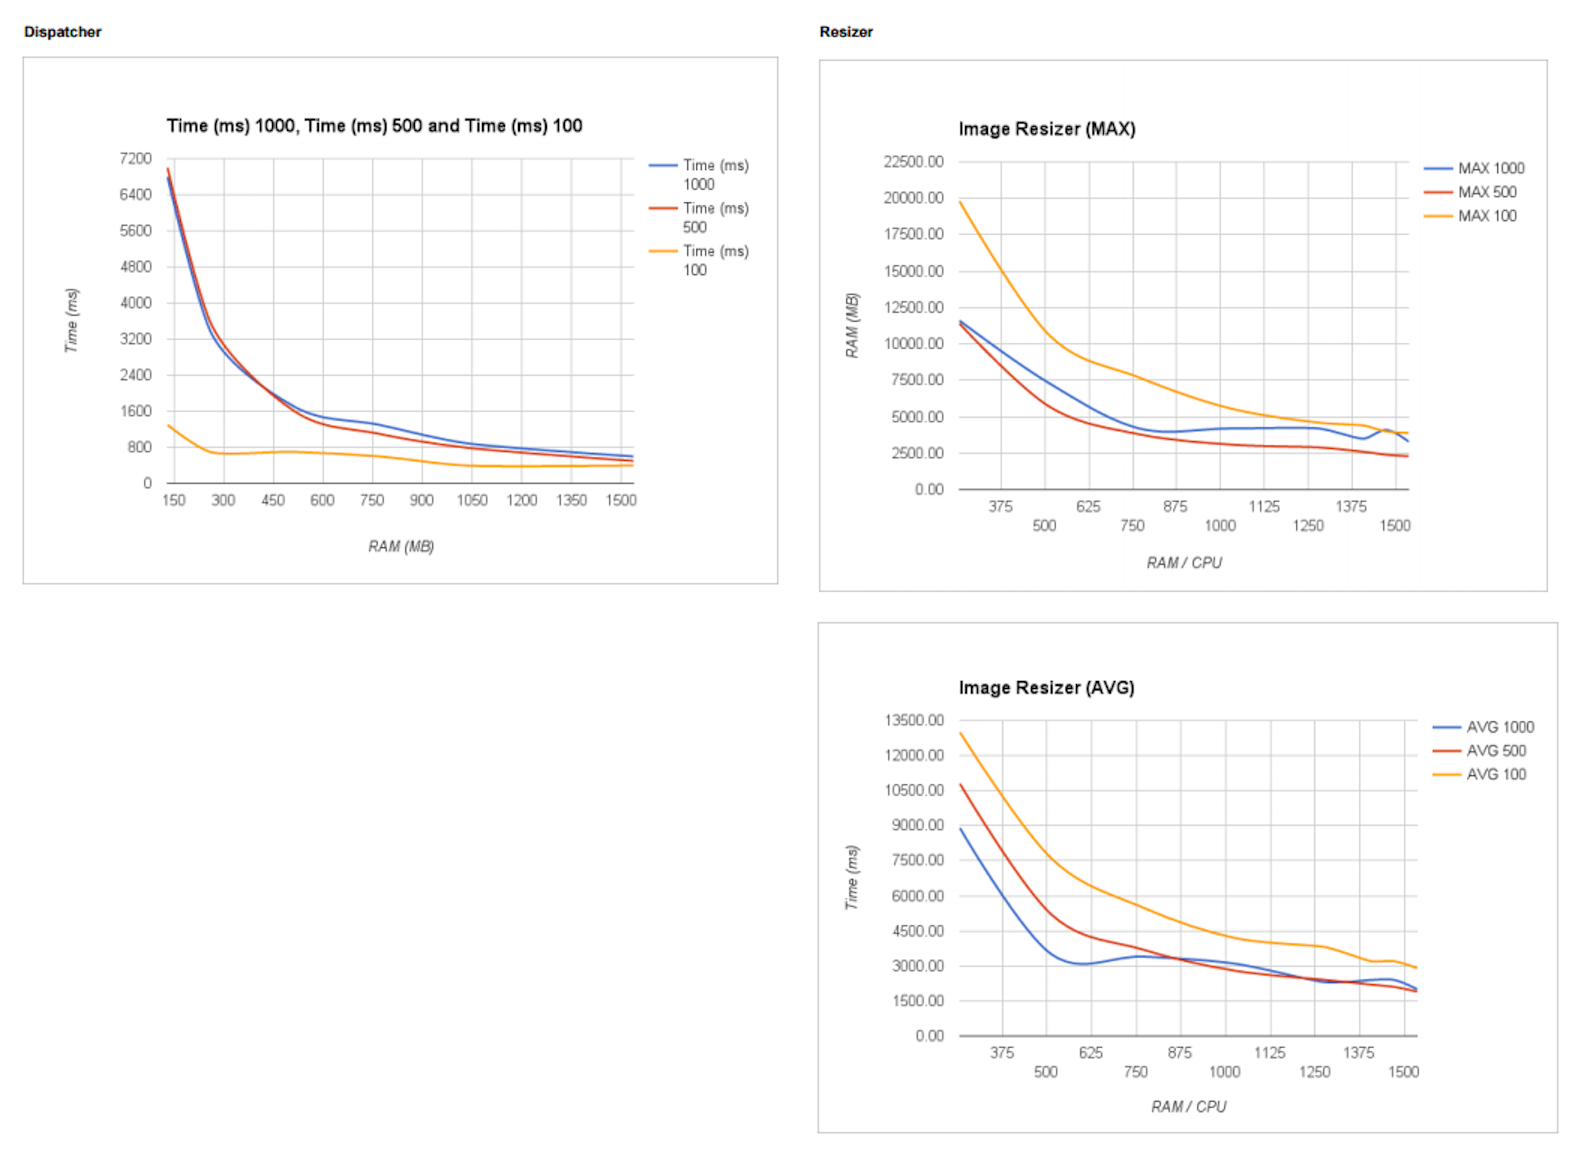 Speed Graphs. MAX is the resize time of the slowest image. AVG is the average resize time across all images in that run.
Claudia
There is a great tool that I used a lot during this project. It is a node cli package - Claudia. Claudia makes it a breeze to deploy your Lambda code to AWS. All with node_modules. Just type claudia update and after a few (read 30) seconds your code is ready to test on AWS. There’s a lot more to Claudia - it’s actually built to make creating microservices with Lambda easy and awesome, but I only used it for pushing the code, and it was simple to setup, use and immensely helpful. If you are doing anything with AWS Lambda I strongly recommend you check it out.
Error Handling
So, wait, what do we do if there’s an error during our Lambda’s execution? We can’t just pretend that they didn’t happen!
With a multi layer setup like this, there a few places where an error might occur. We’re most interested in errors related to images. If we try to read an image and it doesn’t exist (because we’re generating image names from a rule, it might be that some of them weren’t successfully uploaded), that’s an error we want to handle. Or if we get an error during resizing, because the image is corrupt, we want to handle that. How should we handle these errors? We reasoned that these errors cannot be solved by retying the resizing process, so we decided to report them to our API, and notify the Admin to take a look at the errors and decide what he wants to do about it.
We didn’t want to report errors from Lambdas to the API by HTTP, for a couple of reasons. For one, it would be slower than some other alternatives. But the main reason was authentication. If we wanted to use our HTTP API from the Lambda, we’d have to devise a strategy for authenticating the Lambda instances on the API. But we already have both Lambda and the API authenticated on the AWS, so why not just use that?
We went with publishing errors to ElastiCache from Lambda, which is both fast and the authentication is taken care of. But, it wasn’t that simple. To access ElastiCache from Lambda (which you couldn’t do until recently), you need to allow it to access the VPC (Virtual Private Cloud) in which ElastiCache resides. That was a job for our System Admin to figure out.